Tuesday, December 30, 2014

Custom ADF Application with New ADF 12c Alta UI

I was inspired by recently published WorkBetter application with ADF 12c Alta UI demo (you can read more about Alta UI and download WorkBetter application from here - Oracle Alta UI). I have decided to create my own application, using the same guidelines as described by Alta UI. While WorkBetter application is based on EJB, my application is using regular ADF BC model. Right now it displays a list of employees from HR schema and allows to edit selected employee data. In the future, I plan to add CRUD support and more advanced UI features. I would recommend to watch a video from Shay Shmeltzer, he describes how to build your first Alta UI application in ADF.

Here you can download my sample application, implemented with Alta UI - ADFAltaUI.zip. This application implements ADF task flow with employees data. By default, employees data is displayed as a list (you should see how it differs comparing to pre-Alta ADF UI, now UI is much cleaner and only essential data is displayed):


According to Alta UI guidelines, user should be given an option to switch to a grid view. This is useful and gives different perspective for the data view:


In the grid view there is an option to flip an item to see more details about particular entry - address, manager name in this case:


I'm using ADF quick search component to filter employees data. Quick search offers an option to select search field from the list - this is quite handy and comes out of the box:


User can click on any entry and this will navigate to the edit form. According to Alta UI guidelines, edit form should not be overloaded and must contain only necessary data. Sections must be clear enough to separate different data blocks:


You can switch to the list view, the same filtered data will be displayed in the list:


Let's dive into application code now. I'm using helper bean from WorkBetter application, this bean contains a method to trigger navigation by a hidden button located in the fragment (this is how navigation between fragments is implemented in WorkBetter app):


Quick query component is implemented as a standard ADF query block:


List and grid layout views are implemented as separate items, there is no single special component for this. Dedicated buttons are resetting variables and changing the view, based on the setting - one or another view is rendered:


Both components are implemented inside ADF Faces List, while actual list view layout is implemented inside ADF Faces panelGridLayout and grid view layout inside new ADF Faces Deck component:


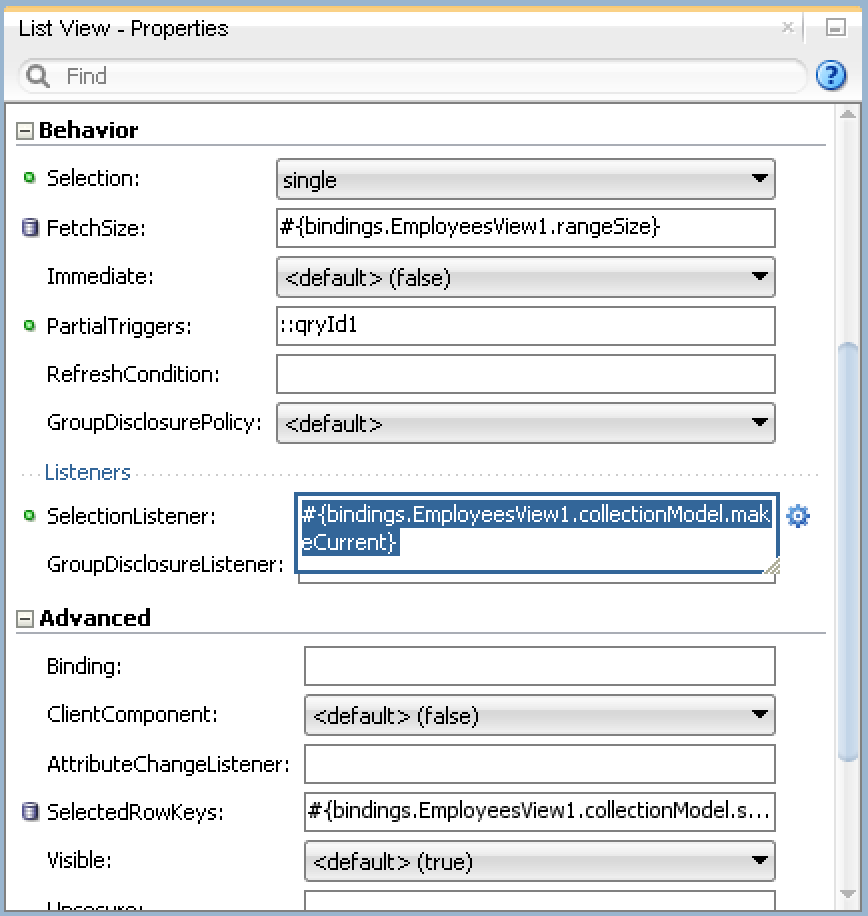
Data item selection is handled automatically by ADF Faces List selection listener - row key is set and preserved in Data Control, this allows to reuse the same selected row in different fragments (for example - edit fragment):


I'm using helper Java Script method from WorkBetter application, this allows to trigger navigation from Java Script level. Server listener invokes custom method from the bean, where it is using hidden button to initiate navigation in the ADF task flow from one fragment to another:


Here is this hidden button, used to initiate navigation between fragments:


Navigation is defined in the ADF task flow - between view and edit fragments:


Managed bean is using helper method from WorkBetter class to initiate navigation through hidden button:


According to Alta UI guidelines, toolbar with Save/Cancel buttons must be placed into top right corner (it should not be in the bottom of the page anymore):


Sample application implements a special logic, to keep the current row, after Rollback functionality was invoked. Couple of methods are overriden in the ADF BC VO implementation class (you must set ClearCacheAfterRollback=false option in the AM):

Thursday, December 25, 2014

Red Samurai ADF Performance Audit Tool v 3.3 - Audit Improvements

Christmas present from Red Samurai - ADF Performance Audit Tool v 3.3. This is a next version after 3.2 (Red Samurai ADF Performance Audit Tool v 3.2 - Large Fetch and Full Scan Audit Optimizations) with a set of features improving audit process.

Implemented features in v 3.3:

1. Logging audit data from multiple WebLogic servers

Audit is improved to log data from several WebLogic servers into the same DB schema, Audit UI dashboard allows to select data from specific server or display combined data from all of them. This helps when ADF application is installed in the cluster environment or different application instances are running on different servers.

Changing current audit server address in UI dashboard, to display audit data logged from that server. Here is the example of showing data from all servers, this is by default:


If user selects DefaultServer:7101, data is filtered from selected server only (there are 30 issues displayed):


Select another server - TestServer:7101 and only one logged issue will be displayed:


2. Data Source switch

UI dashboard is capable to switch between different data sources. This is useful, if there are different DB schemas, where audit data is logged. From the single UI dashboard, on runtime, user could decide which audit data he wants to display


3. Option to turn on/off audit globally with -Dredsamurai.audit=on JVM parameter

It is much easier now to turn on/off audit when it is installed in ADF application. This can be controlled with JVM parameter -Dredsamurai.audit=on/off:

Wednesday, December 24, 2014

Configuring MDS Customisation Layer and Layer Value Combination in ADF

With this post I would like to dive a bit deeper into MDS customisation and layer combination handling. By default, there is defined customisation layer - site. Typically we set our own customisation values for this layer, as a result - all customisations usually are stored under site layer. There could be situations, when more advanced setup would be required - to be able to control layer and layer value combination in a custom way. In other words - to be able to define your own custom layer and then provide customisation values for this layer (MDS customisations will be stored under custom_layer/custom_layer_value, instead of default site/custom_layer_value). Oracle docs would not describe how to handle on runtime layer name to be dynamic and retrieve it from some sort of configuration file. I'm going to describe a technique for this, allowing to combine and group MDS customisations under custom layer and layer values folders.

Sample application - MDSCustomizationsApp_v3.zip is implemented with a separate JDEV project for MDS customisation files. There is no site layer, it starts with profile1/profile2 and then goes with MDS layer values group1/group2. Layer profile1/profile2 switch is dynamic and handled by custom MDS customisation class implemented in the project. This is how it looks like in JDEV (Customisation Context is set with profile2 name) - MDS layer name is retrieved from a custom JAR file stored under JDEV structure (I will describe it below):


In Oracle docs you would find an example of custom class with MDS layer, where layer name will be set as static. In my sample app, I have implemented it as dynamic - layer name is retrieved from configuration file. Layer name is retrieved and assigned during first application load, it is not reset until the next restart. Here is the example of layer name variable initialisation:


Method getValue is overriden as well, to return different MDS layer customisation values, based on ADF Security.

Method getName is overriden to return MDS layer name on application initialisation. Custom method retrieveDynamicLayerName is implemented to retrieve MDS layer name from configuration file. This method works on design and runtime, this means it can be used for MDS design time seeded customisations:


In order to use custom SiteProfileCC class on runtime, we need to package it into separate JAR file and include this JAR into EAR. In my example, configuration file is packaged together with the class (this would allow to use it for design time MDS seeded customizations):


You must copy JAR file with MDS seeded customisation class SiteProfileCC into JDEV directory - jdeveloper/jdev/lib/patches, this would make it visible for design time MDS seeded customisations:


I have defined multiple MDS layers with layer values. Two layers are used for the test - profile1 and profile2. Each of these layers is assigned with group1 and group2 MDS layer values:


Application must be configured to use custom class SiteProfileCC, this is done in add-config.xml file:


Customisations are implemented in the separate JDEV application, all customisations are deployed to MAR file (we can export them directly and apply to the running instance of ADF application):


MAR file is included into main application deployment profile, under EAR level. You should notice - MDS customisation class JAR file is included to be packaged under lib folder on EAR level (this is important, otherwise application will not be started, because it will fail to load custom SiteProfileCC class):


Let's see how it works. I have provided profile1 for MDS layer in configuration file and redeployed application:


Login with user redsam1, the one granted with Group One role:


Application screen is loaded with customisations based on MDS layer and layer value - read-only table is rendered on the right side:


Login with user redsam2, the one granted with Group Two role:


Customisations for profile1 and group two are applied. Instead of Submit button, Save button is implemented:


Let's change MDS layer to be profile2 and test again with the same users:


User redsam1 gets customisation applied with Jobs block rendered below Employees:


User redsam2 gets customisations with Save and Cancel buttons included:

Saturday, December 13, 2014

How To Set EAR Upload Size for Oracle Enterprise Manager

By default, there is a limit for EAR upload size (~40 MB) in Enterprise Manager. If your ADF application is fairly big, you may face this limitation and will not be able to deploy through Enterprise Manager. Deployment for large EAR would work through WebLogic console, WLST script or directly from JDEV, however sometimes you may need to deploy through Enterprise Manager. I will describe in this post, how you could increase the limit - we are going to extract Enterprise Manager application EAR and change maximum file upload size specified in web.xml.

In my case, the requirement was to be able to deploy ~47 MB EAR file:


When trying to deploy this EAR through Enterprise Manager, I would get the error about maximum file upload size exceeded:


You must navigate to the folder, where applications are deployed for your domain (alternatively, double check in WLS for EM application, where EAR file is stored). There must be one called em.ear, this is the deployment for Enterprise Manager application:


Extract this EAR (make sure to create backup), you will find em.war file inside - we need this file:


Extract em.war file now. Navigate to WEB-INF folder, you will find web.xml file there. Open web.xml file for editing:


Search for org.apache.myfaces.trinidad.UPLOAD_MAX_DISK_SPACE parameter in web.xml and change its value to be large enough to accept the size of EAR file you want to deploy. I have set it to 50 MB = 52428800 bytes:


Make sure to pack everything back, and keep original em.war and em.ear files structure:


After all the are changes applied, large EAR file is accepted in Enterprise Manager and we can proceed with the deployment:

Monday, December 8, 2014

ADF Mythbusters UKOUG'14

I would like to post the slides from our recent session on UKOUG'14 conference - ADF Mythbusters. This session was presented by my colleague from Red Samurai Consulting - Florin Marcus. The goal was to break popular ADF myths. We have logged Oracle Support SR's, each myth in the slide is assigned with SR number.

Slides are available on SlideShare:


The following topics are covered in the presentation:
  • ADF BC Batches Of Functionality
  • AM Pools and DB Connection Pools
  • Activation-Safe Application Modules
  • Maximum Number of Regions Per Page
  • JSP vs Facelets
More detailed description and analysis data are available in the slides.

Thursday, December 4, 2014

Adaptive Case Management 12c and ADF Human Tasks

I'm diving into the new topic - Adaptive Case Management 12c and ADF integration. Today will be the first post in the category and there are more posts planned for the future. I strongly believe that ACM (Adaptive Case Management) makes a great extension for standard BPM. Mainly because it allows to define a loose process, without strict order steps. Process steps can be executed in different order, depending on the situation requirements, at given time. I will be explaining how to implement ADF Human Task for ACM activity and will share several tips, how to make it run in BPM Workspace application.

This is how sample application (HotelBookingProcessing_v1.zip) is constructed, there are two Human Tasks (AddHotelBooking and ValidateHoteBooking) and HotelBookingProcessing Case control:


HotelBookinfProcessing case is defined with Hotel Booking Details data type (this type is based on XSD schema and is defined as Business Component variable - don't mix up with ADF Business Components) - you can think about it as about main data structure type for the case, this can be transferred into every case activity:


There are two stakeholders defined, this could help to control who could have access to human task and case activity. Customer Service Representative is supposed to add new hotel booking, while Financial Accountant can approve or reject it:


I have created Human Task activity directly through composite, it is not necessary to have BPM process to define human tasks. Important to set Application Context property for Human Task to be OracleBPMProcessRolesApp, this will help later with security roles configuration in BPM workspace:


In order to register human task with Case management, we are given option to promote human task as a case activity. This will allow to initiate human task from the case management:


We can define input and output for the case activity, based on the same data type defined in the case. This will allow to transfer data from the case to the activity, and to the underlying human task in our situation:


You could generate ADF form case data, this form will be rendered in BPM workspace case UI. I'm going to look into customisation options of this kind of form in my future posts (checkbox is set to generate editable form):


This is how case data form is rendered, out of the box is given option to save and reset data for the case - Hotel Booking Details:


Human task form is generated in the same way as it was in 11g - no change here for 12c. You could auto generate this form, it generates a lot of code and I would prefer to build custom light form instead:


Important hint - auto generated human task form will not render in BPM workspace window. You need to change FRAME_BUSTING parameter generated in web.xml from differentOrigin to never. With differentOrigin option it doesn't render human task form, in 11g it was generating with option set to never, for some reason this was changed in 12c - not for good:


With FRAME_BUSTING set to never, human task form renders well:


Human task is started directly from the case activity - Add Hotel Booking from the available list of activities:


We can track in the case activity log - when activity was started, completed or modified. This is quite helpful info to track activity history:


One of the main advantages - user could decide the order of activities, on contrary to strict BPM process. Start Validate Hotel Booking activity, this will create new task for Financial Accountant:


Activity was started, we can see this from the audit log:


This is readonly human task, rendered in BPM workspace - Financial Accountant could approve or reject it:


Case can be closed and hotel booking approved: